Android Splitting the Tab
In this tutorial, we will move our ListView onto one tab and our form onto a separate tab of a TabView. Along the way, we will also arrange to update our form based on a ListView selections or clicks, even though the Save button will still only add new restaurants to our list.
This involves:
You should see a two-tab UI like this:

First, add an import for android.widget.AdapterView to LunchList. Then, create an AdapterView.OnItemClickListener named onListClick:
To do this, you need to do two things. First, move the name, address, and types variables into data members and populate them in the activity's onCreate(). Our current code has them as local variables in the onSave listener object's onClick() method.
So, you should have some data members like:
And some code after the call to setContentView() in onCreate() like:
This is just one extra line of code, in the onItemClick() method of our onListClick listener object:
By Mohd Zulkamal
NOTE : – If You have Found this post Helpful, I will appreciate if you can Share it on Facebook, Twitter and Other Social Media Sites. Thanks =)
Note : Please follow the Android Tutorial Post HereBefore You Step On This Post.
Rework the Layout
First, we need to change our layout around, to introduce the tabs and split our UI between a list tab and a details tab.This involves:
- Removing the RelativeLayout and the layout attributes leveraging it,as that was how we had the list and form on a single screen
- Add in a TabHost, TabWidget, and FrameLayout, the latter of which is parent to the list and details
<TabHost xmlns:android="http://schemas.android.com/apk/res/android"
android:id="@android:id/tabhost"
android:layout_width="fill_parent"
android:layout_height="fill_parent">
  <LinearLayout
  android:orientation="vertical"
  android:layout_width="fill_parent"
  android:layout_height="fill_parent">
    <TabWidget android:id="@android:id/tabs"
    android:layout_width="fill_parent"
    android:layout_height="wrap_content"/>
    <FrameLayout android:id="@android:id/tabcontent"
    android:layout_width="fill_parent"
    android:layout_height="fill_parent">
      <ListView android:id="@+id/restaurants"
      android:layout_width="fill_parent"
      android:layout_height="fill_parent"/>
      <TableLayout android:id="@+id/details"
      android:layout_width="fill_parent"
      android:layout_height="wrap_content"
      android:stretchColumns="1"
      android:paddingTop="4dip">
        <TableRow>
          <TextView android:text="Name:" />
          <EditText android:id="@+id/name" />
        </TableRow>
        <TableRow>
          <TextView android:text="Address:" />
          <EditText android:id="@+id/addr" />
        </TableRow>
        <TableRow>
          <TextView android:text="Type:" />
          <RadioGroup android:id="@+id/types">
            <RadioButton android:id="@+id/take_out"
            android:text="Take-Out"/>
            <RadioButton android:id="@+id/sit_down"
            android:text="Sit-Down"/>
            <RadioButton android:id="@+id/delivery"
            android:text="Delivery"/>
          </RadioGroup>
        </TableRow>
        <Button android:id="@+id/save"
        android:layout_width="fill_parent"
        android:layout_height="wrap_content"
        android:text="Save"/>
      </TableLayout>
    </FrameLayout>
  </LinearLayout>
</TabHost>
Wire In the Tabs
Next, we need to modify the LunchList itself, so it is a TabActivity (rather than a plain Activity) and teaches the TabHost how to use our FrameLayout contents for the individual tab panes.To do this:- Add imports to LunchList for android.app.TabActivity and android.widget.TabHost
- Make LunchList extend TabActivity
- Obtain 32px high icons from some source to use for the list and details tab icons, place them in LunchList/res/drawable as list.png and restaurant.png, respectively
- Add the following code to the end of your onCreate() method:
        TabHost.TabSpec spec = getTabHost().newTabSpec("tag1");

        spec.setContent(R.id.restaurants);
        spec.setIndicator("List", getResources().getDrawable(R.drawable.list));

        getTabHost().addTab(spec);

        spec = getTabHost().newTabSpec("tag2");

        spec.setContent(R.id.details);
        spec.setIndicator("Details",
                getResources().getDrawable(R.drawable.restaurant));
        getTabHost().addTab(spec);
        getTabHost().setCurrentTab(0);
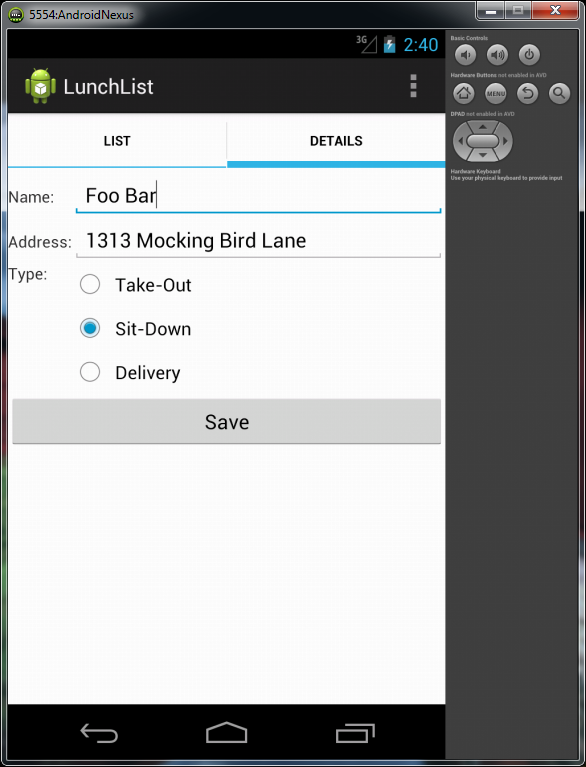
At this point, you can recompile and reinstall the application and try it out.You should see a two-tab UI like this:
Get Control On List Events
Next, we need to detect when the user clicks on one of our restaurants in the list, so we can update our detail form with that information.First, add an import for android.widget.AdapterView to LunchList. Then, create an AdapterView.OnItemClickListener named onListClick:
private AdapterView.OnItemClickListener onListClick = new AdapterView.OnItemClickListener() {
        public void onItemClick(AdapterView<?> parent, View view, int position,
                long id) {
            Restaurant r = model.get(position);
            name.setText(r.getName());
            address.setText(r.getAddress());
            if (r.getType().equals("sit_down")) {
                types.check(R.id.sit_down);
            } else if (r.getType().equals("take_out")) {
                types.check(R.id.take_out);
            } else {
                types.check(R.id.delivery);
            }
            getTabHost().setCurrentTab(1);
        }
    };
Update Our Restaurant Form On Clicks
Next, now that we have control in a list item click, we need to actually find the associated restaurant and update our details form.To do this, you need to do two things. First, move the name, address, and types variables into data members and populate them in the activity's onCreate(). Our current code has them as local variables in the onSave listener object's onClick() method.
So, you should have some data members like:
    EditText name = null;
    EditText address = null;
    RadioGroup types = null;
And some code after the call to setContentView() in onCreate() like:
        name = (EditText) findViewById(R.id.name);
        address = (EditText) findViewById(R.id.addr);
        types = (RadioGroup) findViewById(R.id.types);
Switch Tabs On Clicks
Finally, we want to switch to the detail form when the user clicks a restaurant in the list.This is just one extra line of code, in the onItemClick() method of our onListClick listener object:
getTabHost().setCurrentTab(1);
Full Code
import java.util.ArrayList;
import java.util.List;

import android.app.TabActivity;
import android.os.Bundle;
import android.view.LayoutInflater;
import android.view.Menu;
import android.view.View;
import android.view.ViewGroup;
import android.widget.AdapterView;
import android.widget.ArrayAdapter;
import android.widget.Button;
import android.widget.EditText;
import android.widget.ImageView;
import android.widget.ListView;
import android.widget.RadioGroup;
import android.widget.TabHost;
import android.widget.TextView;

public class Main extends TabActivity {

    List<Restaurant> model = new ArrayList<Restaurant>();
    RestaurantAdapter adapter = null;
    EditText name = null;
    EditText address = null;
    RadioGroup types = null;

    @Override
    public void onCreate(Bundle savedInstanceState) {
        super.onCreate(savedInstanceState);
        setContentView(R.layout.activity_main);
        name = (EditText) findViewById(R.id.name);
        address = (EditText) findViewById(R.id.addr);
        types = (RadioGroup) findViewById(R.id.types);
        Button save = (Button) findViewById(R.id.save);
        save.setOnClickListener(onSave);
        ListView list = (ListView) findViewById(R.id.restaurants);
        adapter = new RestaurantAdapter();
        list.setAdapter(adapter);
        TabHost.TabSpec spec = getTabHost().newTabSpec("tag1");

        spec.setContent(R.id.restaurants);
        spec.setIndicator("List", getResources().getDrawable(R.drawable.list));

        getTabHost().addTab(spec);

        spec = getTabHost().newTabSpec("tag2");

        spec.setContent(R.id.details);
        spec.setIndicator("Details",
                getResources().getDrawable(R.drawable.restaurant));
        getTabHost().addTab(spec);
        getTabHost().setCurrentTab(0);

        list.setOnItemClickListener(onListClick);
    }

    private View.OnClickListener onSave = new View.OnClickListener() {
        public void onClick(View v) {
            Restaurant r = new Restaurant();
            r.setName(name.getText().toString());
            r.setAddress(address.getText().toString());
            switch (types.getCheckedRadioButtonId()) {
            case R.id.sit_down:
                r.setType("sit_down");
                break;
            case R.id.take_out:
                r.setType("take_out");
                break;
            case R.id.delivery:
                r.setType("delivery");
                break;
            }
            adapter.add(r);
        }
    };

    private AdapterView.OnItemClickListener onListClick = new AdapterView.OnItemClickListener() {
        public void onItemClick(AdapterView<?> parent, View view, int position,
                long id) {
            Restaurant r = model.get(position);
            name.setText(r.getName());
            address.setText(r.getAddress());
            if (r.getType().equals("sit_down")) {
                types.check(R.id.sit_down);
            } else if (r.getType().equals("take_out")) {
                types.check(R.id.take_out);
            } else {
                types.check(R.id.delivery);
            }
            getTabHost().setCurrentTab(1);
        }
    };

    @Override
    public boolean onCreateOptionsMenu(Menu menu) {
        // Inflate the menu; this adds items to the action bar if it is present.
        getMenuInflater().inflate(R.menu.main, menu);
        return true;
    }

    public class RestaurantAdapter extends ArrayAdapter<Restaurant> {
        RestaurantAdapter() {
            super(Main.this, android.R.layout.simple_list_item_1, model);
        }

        public View getView(int position, View convertView, ViewGroup parent) {
            View row = convertView;
            RestaurantHolder holder = null;
            if (row == null) {
                LayoutInflater inflater = getLayoutInflater();
                row = inflater.inflate(R.layout.row, parent, false);
                holder = new RestaurantHolder(row);
                row.setTag(holder);
            } else {
                holder = (RestaurantHolder) row.getTag();
            }
            holder.populateFrom(model.get(position));
            return (row);
        }

    }

    static class RestaurantHolder {
        private TextView name = null;
        private TextView address = null;
        private ImageView icon = null;

        RestaurantHolder(View row) {
            name = (TextView) row.findViewById(R.id.title);
            address = (TextView) row.findViewById(R.id.address);
            icon = (ImageView) row.findViewById(R.id.icon);
        }

        void populateFrom(Restaurant r) {
            name.setText(r.getName());
            address.setText(r.getAddress());
            if (r.getType().equals("sit_down")) {
                icon.setImageResource(R.drawable.ball_red);
            } else if (r.getType().equals("take_out")) {
                icon.setImageResource(R.drawable.ball_yellow);

            } else {
                icon.setImageResource(R.drawable.ball_green);
            }
        }
    }

}
By Mohd Zulkamal
NOTE : – If You have Found this post Helpful, I will appreciate if you can Share it on Facebook, Twitter and Other Social Media Sites. Thanks =)