Posts

Showing posts with the label Android

Android Popup box/Dialog box code example - Java

Image
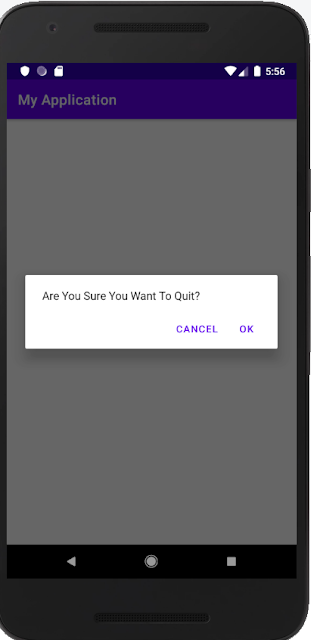
When Developing an Android application, sometimes you want to have confirmation on the action done by the user. Using a popup box or dialog box will help to get the user's intention on what are they doing.  Here is the sample code to use the popup box/dialog box to show a message to the user.  Full Code example. import androidx.appcompat.app.AlertDialog; import androidx.appcompat.app.AppCompatActivity; import android.content.DialogInterface; import android.os.Bundle; public class MainActivity extends AppCompatActivity { @Override protected void onCreate(Bundle savedInstanceState) { super.onCreate(savedInstanceState); setContentView(R.layout.activity_main); } @Override public void onBackPressed(){ ShowMessageExit("Are You Sure You Want To Quit?"); } private void ShowMessageExit(String Message){ new AlertDialog.Builder(this) .setMessage(Message) .setPositiveButton(android.R.str

Example code on how to open dialog box when click on the list AdapterView - Android

Image
Today I want to show how to open list items in the dialog box. For this tutorial, you need to have:- Dialog design view_item.xml MyDialogFragment.java class OnClick Event to call dialog. Announcement.java Class AnnouncementHelper Class OnCreateView Method view_item.xml <RelativeLayout xmlns:android="http://schemas.android.com/apk/res/android" android:layout_width="fill_parent" android:layout_height="fill_parent" > <LinearLayout xmlns:android="http://schemas.android.com/apk/res/android" android:layout_width="fill_parent" android:layout_height="match_parent" android:orientation="horizontal" android:padding="5dip" android:id="@+id/Announcement" android:transitionGroup="false"> <ImageView android:id="@+id/icon" android:layout_width="wrap_content" android:layout_height="wrap_content" android:layout_alig

how to select date time using calendar android

Image
This tutorial shows how to set date time in android app when you click on the textbox. Note : This example using Andorid Studio to create project. Im using Sample Blank Activity with Fragment sample. Step By Step  Add One EditText on the fragment Create DateTimeFragment.java class Copy Paste DateTimeFragment.java class below. Override onViewCreated event from fragment Done. Full Source Code of MainActivity class + Fragment / placeholder class package com.test.selectdatetime; import android.app.Dialog; import android.content.Context; import android.support.annotation.Nullable; import android.support.v4.app.DialogFragment; import android.support.v7.app.ActionBarActivity; import android.support.v4.app.Fragment; import android.os.Bundle; import android.view.LayoutInflater; import android.view.Menu; import android.view.MenuItem; import android.view.View; import android.view.ViewGroup; import android.view.inputmethod.InputMethodManager; import android.widget.Edi

How to create multiple tab with different fragment / view - Android app

Image
Most beginner android developer wonder how to create different fragment for each tab in their android app. Please follow this tutorial to create basic android app with 3 tab before continue with this tutorial. ( http://swengineercode.blogspot.com/2015/05/how-to-create-multiple-tab-on-android.html ) This example using android studio. Kindly download the studio here ( https://developer.android.com/sdk/index.html ) Step By Step  1. Open "Three tab example" android app. ( Refer this tutorial to create "Three tab example" project ) 2. Create New Fragment 3. Give fragment name "FragmentOne" 4. Repeat Step 2 to create next fragment. Give name for new fragment "FragmentTwo". 5.  Now you already have three tab application with 3 fragment. Next we need to link the fragment with the respective tab. Follow below code. Table below show that each section in out tab that should we link. Tab Fragment Section 1 fragment_main.xml Section 2 fragment_fragment_one.xm

How to create multiple tab on android app

Image
This tutorial to show how to create multiple tab on Android App. This example using android studio. Kindly download the studio here ( https://developer.android.com/sdk/index.html ) Step By Step 1. Open Android Studio. 2. Choose Start New Android Studio Project 3. Set Application Name "Three tab example" 4. Choose Phone Or Tablet  Note : Minimum SDK means the lower SDK that your application will support. The more higher your API level the Less phone can support your application. This is because not every phone now have latest version of android OS.  5. Choose Tabbed Activity 6. Set Navigation Style to Action Bar Tabs With View Pager 7. Click Finish button. Now you have basic android app with three tab navigation. By Mohd Zulkamal NOTE : – If You have Found this post Helpful, I will appreciate if you can Share it on Facebook, Twitter and Other Social Media Sites. Thanks =)

Android Splitting the Tab

Image
In this tutorial, we will move our ListView onto one tab and our form onto a separate tab of a TabView . Along the way, we will also arrange to update our form based on a ListView selections or clicks, even though the Save button will still only add new restaurants to our list. Note : Please follow the Android Tutorial Post Here Before You Step On This Post. Rework the Layout First, we need to change our layout around, to introduce the tabs and split our UI between a list tab and a details tab. This involves: Removing the RelativeLayout and the layout attributes leveraging it,as that was how we had the list and form on a single screen Add in a TabHost , TabWidget , and FrameLayout , the latter of which is parent to the list and details To accomplish this, replace your current LunchList/res/layout/main.xml with the following: <TabHost xmlns:android="http://schemas.android.com/apk/res/android" android:id="@android:id/tabhost" android:layout_width="fill_parent

Android - Custom ListAdapter look more fancier

Image
In this tutorial, we will update the layout of our ListView rows, so they show both the name and address of the restaurant, plus an icon indicating the type. Along the way, we will need to create our own custom ListAdapter to handle our row views and a RestaurantHolder to populate a row from a restaurant. Note : Please follow the Android Tutorial Post Here Before You Step On This Post. Create a Stub Custom Adapter Create a stub implementation of a RestaurantAdapter that will be where we put our logic for  creating our own custom rows. That can look like this, implemented as an inner class of LunchList : class RestaurantAdapter extends ArrayAdapter<Restaurant> {          RestaurantAdapter() {                 super(LunchList.this,                 android.R.layout.simple_list_item_1,model);          } } The above code use hard-wire in the android.R.layout.simple_list_item_1 layout for now, and we get our Activity and model from LunchList itself. Next we need to change our adapter