Posts

How to disable asp.net version and server information on HTTP Headers

Image
Scenario: We identified that the target web server is disclosing the ASP.NET version in its HTTP response. This information might help an attacker gain a greater understanding of the systems in use and potentially develop further attacks targeted at the specific version of ASP.NET. Impact: An attacker might use the disclosed information to harvest specific security vulnerabilities for the version identified. Solution Disable the asp.net version and server information on http headers. Open the web.config file and add this code in the web.config file : <system.webServer>     <httpProtocol>         <customHeaders>             <remove name="Server" />             <remove name="X-AspNet-Version" />             <remove name="X-AspNetMvc-Version" /...
How to disable httpOnlyCookies - asp.net

Scenario HTTP only cookies cannot be read by client-side script therefore marking a cookie as HTTP only can provide an additional layer of protection against cross-site script attack. Impact: During Cross-Site scripting attack and attacker might easily access cookies and hijack the victim’s session. Solution You can disable the httpOnlyCookies on the web.config file. Open the web.config file and add the configuration on the httpCookies element like example below : <system.web> : : <httpCookies httpOnlyCookies="false" requireSSL="false" domain="" /> : :  </system.web> By Mohd Zulkamal NOTE : – If You have Found this post Helpful, I will appreciate if you can Share it on Facebook, Twitter and Other Social Media Sites. Thanks =)

Store and retrieve image from database MSSQL - asp.net

This is a example to upload image and store into database. The example also show how to retrieve image from database. Note : Assume the web page have their own master page SQL Create Table SET ANSI_NULLS ON GO SET QUOTED_IDENTIFIER ON GO CREATE TABLE [dbo].[imageTest](     [ID] [int] IDENTITY(1,1) NOT NULL,     [Image] [image] NULL,  CONSTRAINT [PK_imageTest] PRIMARY KEY CLUSTERED (     [ID] ASC )WITH (PAD_INDEX  = OFF, STATISTICS_NORECOMPUTE  = OFF, IGNORE_DUP_KEY = OFF, ALLOW_ROW_LOCKS  = ON, ALLOW_PAGE_LOCKS  = ON) ON [PRIMARY] ) ON [PRIMARY] TEXTIMAGE_ON [PRIMARY] GO ASPX page Code     <asp:Label ID="Label1" runat="server" Text="Image Upload :"></asp:Label>     <asp:FileUpload ID="FileUpload1" runat="server" />     <br />     <asp:Button ID="Button1" runat="server" Text="Save" OnClick="Button1_Click" />     ...

Android Splitting the Tab

Image
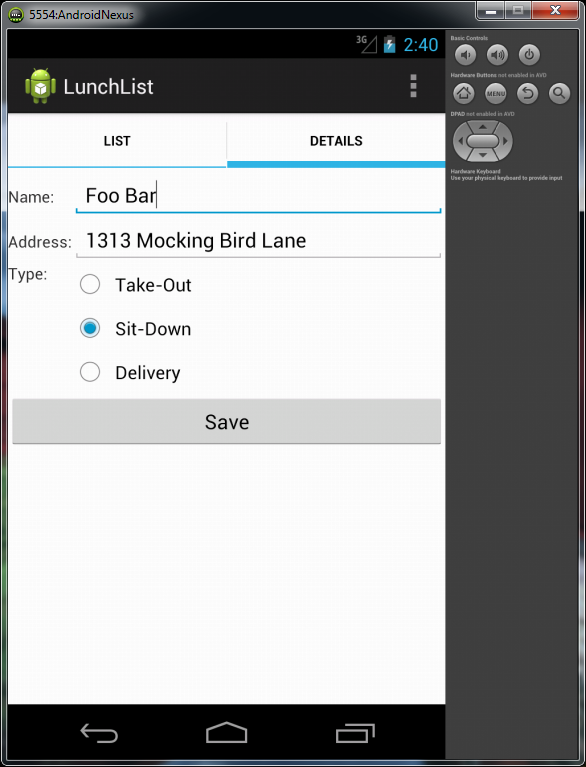
In this tutorial, we will move our ListView onto one tab and our form onto a separate tab of a TabView . Along the way, we will also arrange to update our form based on a ListView selections or clicks, even though the Save button will still only add new restaurants to our list. Note : Please follow the Android Tutorial Post Here Before You Step On This Post. Rework the Layout First, we need to change our layout around, to introduce the tabs and split our UI between a list tab and a details tab. This involves: Removing the RelativeLayout and the layout attributes leveraging it,as that was how we had the list and form on a single screen Add in a TabHost , TabWidget , and FrameLayout , the latter of which is parent to the list and details To accomplish this, replace your current LunchList/res/layout/main.xml with the following: <TabHost xmlns:android="http://schemas.android.com/apk/res/android" android:id="@android:id/tabhost" android:layout_width="fill_parent...

Example Upload File - ASP.NET

This is example of upload file using asp.net. Html   <fieldset style="width: 804px" align="center">         <legend><em>Using the FileUpload Control</em>&nbsp;</legend>         <div align="left" style="text-align: center">             <form id="form1" runat="server">                 <div>                     <table style="width: 90%">                         <tr>                          ...

Android - Custom ListAdapter look more fancier

Image
In this tutorial, we will update the layout of our ListView rows, so they show both the name and address of the restaurant, plus an icon indicating the type. Along the way, we will need to create our own custom ListAdapter to handle our row views and a RestaurantHolder to populate a row from a restaurant. Note : Please follow the Android Tutorial Post Here Before You Step On This Post. Create a Stub Custom Adapter Create a stub implementation of a RestaurantAdapter that will be where we put our logic for  creating our own custom rows. That can look like this, implemented as an inner class of LunchList : class RestaurantAdapter extends ArrayAdapter<Restaurant> {          RestaurantAdapter() {                 super(LunchList.this,                 android.R.layout.simple_list_item_1,model); ...

Android - Store Class Object into ArrayList or List

Image
In this tutorial, we will change our model to be a list of restaurants, rather than just one. Then, we will add a ListView to view the available restaurants. This will be rather incomplete, in that we can only add a new restaurant, not edit or delete an existing one. We will cover those steps too in a later tutorial. Note : Please refer previous post before step on this tutorial Hold a List of Restaurants First, if we are going to have a list of restaurants in the UI, we need a list of restaurants as our model. So, in LunchList , change: Restaurant r=new Restaurant(); to List<Restaurant> model=new ArrayList<Restaurant>(); Note that you will need to import java.util.List and java.util.ArrayList as well. Save Restaurant Object to List All we need to do is add a local restaurant r variable, populate it, and add it to the list: private View.OnClickListener onSave=new View.OnClickListener() {           public void onClick(View v) {...