Posts

What you need to know about Static class

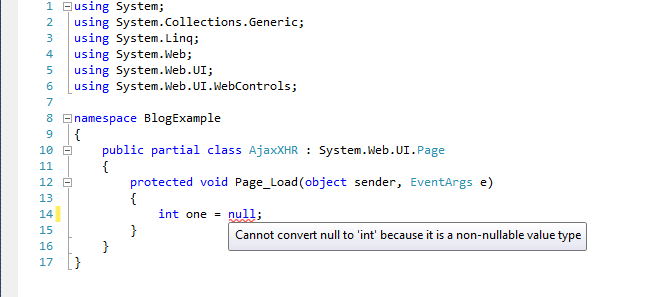
Static Class Properties A static class cannot be instantiated. That means you cannot create an instance of a static class using new operator.  A static class is a sealed class. That means you cannot inherit any class from a static class.  A static class can have static members only. Having non-static member will generate a compiler error. A static class is less resource consuming and faster to compile and execute.  Static Class Example Public static class MyStaticClass  {      Private static int myStaticVariable;      Public static int StaticVariable;      {         Get        {            return myStaticVariable;        }         Set        {            myStaticVariable = value;        }     }    Public static void Function()    {    }  }  Note : The static class can directly called out from the other class for example you create class ClassA , and you can directly type in ClassA to call Function method in class MyStaticClass like this. MyStaticClass.Function(); By Mohd Zul

Nullable Types in .Net C#

Image
Since .NET version 2.0, the new feature introduce which is nullable types.  In the basic programming, how do you assign null to the promitive type such as int, long, and bool. Its is impossible. The following code shows how to define an integer as nullable type and checks if the value of the integer is null or not. Example  /// <summary> /// Nullable types /// </summary> public static void TestNullableTypes() { // Syntax to define nullable types int? counter; counter = 100; if (counter != null) { // Assign null to an integer type counter = null; Console.WriteLine("Counter assigned null."); } else { Console.WriteLine("Counter cannot be assigned null."); Console.ReadLine(); } } If you remove the "?" from int? counter, you will see a warning as following: By Mohd Zulkamal NOTE : – If You have Found this post Helpful, I will appreciate if you can Share it on Facebook, Twitter and Other Social

How to enable GZip or Deflate on ASP.NET(HTTP Compression)

HTTP compression is a capability that can be built into web servers and web clients to make better use of available bandwidth, and provide greater transmission speeds between both. HTTP data is compressed before it is sent from the server: compliant browsers will announce what methods are supported to the server before downloading the correct format; browsers that do not support compliant compression method will download uncompressed data. Compression as defined in RFC 2616 can be applied to the response data from the server (but not to the request data from the client) The most common compression schemas include gzip and deflate. So how do we gonna achieve this  HTTP Compression on asp.net application.? Here is the Step : Open Global.asax file. Add the method IsCompressionAllowed() to check if compression is allowed. Add code in Application_Start event. Global.asax File void Application_Start(object sender, EventArgs e)         {             //check if request is aspx page.. if java

Basics of .NET Programs and Memory Management

Image
.NET has made a lot of improvements in its core to enhance the performance of an application. It is the first solid-core environment that really connects to all parts of the technology for developers. Inorder to make solid footsteps in the .NET environment, it would be great to know about the basic advantages and also the architecture of the .NET environment that you are going to start working on. The most important infrastructural component of the .NET framework is Common Language Runtime (CLR) . The code that you write inside the framework is called the managed code , which benefits from cross-language integration, cross-language exception handling, enhanced security,  versioning, and easy deployment support. Every component in a managed environment conveys some specific rule sets. When you write your code in a managed environment, the code gets compiled into the common intermediate language (CIL) . This language remains constant or equivalent to a code that might be compiled from an

Control Webpart Visible/Enable using macro in Kentico

Image
Simple post just to show how you can enable or visible the webpart in certain page. This is basically to avoid using many template. You can use only one template that have many webpart, and you can control visible/enable it using macro. Macro Code {% if(NodeAlias == "Search") {    return true; } else {  return false; } %} By Mohd Zulkamal NOTE : – If You have Found this post Helpful, I will appreciate if you can Share it on Facebook, Twitter and Other Social Media Sites. Thanks =)

How to track download file analytics in Kentico 7

Let say you create one Document Type in Kentico CMS, and inside the document type got one field for attachment. So you want to track/count how many time the document download using Web Analytic feature in Kentico. First of all you need to enable the web analytic feature in  Kentico. Follow this link to read more about web analytic in kentico. Here is the solution to track/count download file for a DocumentType Field. A bit of customization is required to track all the downloaded files. The problem is that only CMS.File document type downloads are tracked by default. However, you can change that by going to the file: \CMSPages\GetFile.aspx.cs Within this file, around line 1268 or Find method LogEvent there is the following condition: if (IsLiveSite && (file.FileNode != null) && (file.FileNode.NodeClassName.ToLower() == "cms.file")) You have to alter it to the following one so all files are logged, not only files attached to a CMS.File document: if (IsLiveSite

Create Navigation Using Kentico 7 Repeater Webpart

Image
Kentico CMS for ASP.NET empowers marketers and developers in creating websites without limits. It's the ultimate solution for your website, store, community and on-line marketing initiatives. Today i want to show how you can use Repeater Webpart to create one Navigation. On this post i will more focus on the Transformation . Let say this is your navigation html code : Navigation Html Code <ul class="megamenu">    <li>     <a href="#_" class="megamenu_drop">LEVEL ONE</a>     <div class="dropdown_3columns dropdown_container">       <ul class="dropdown_flyout">         <li class="dropdown_parent">           <a href="#_">LEVEL TWO</a>           <ul class="dropdown_flyout_level">             <li>               <a href="#_">LEVEL THREE</a>             </li>           </ul>         </li>       </ul>